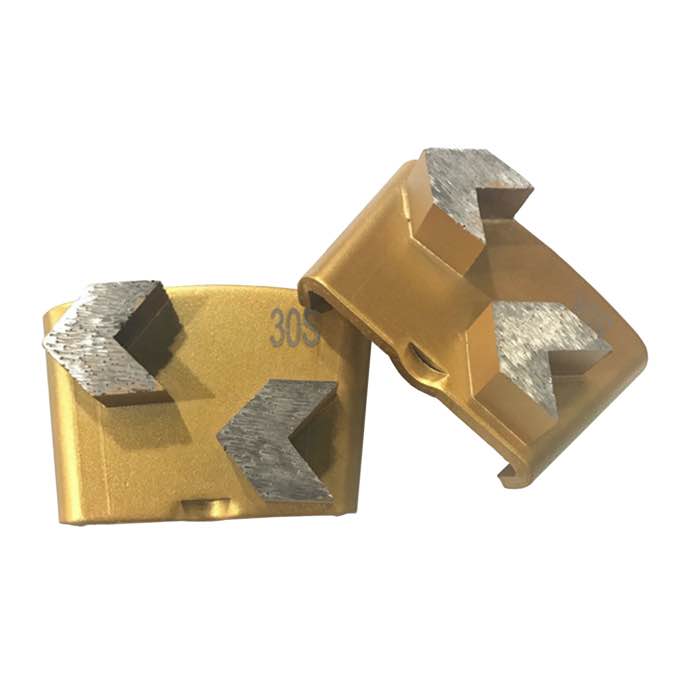
Exposing aggregate means grinding off the cement paste until the stones in the mix show through. Light exposure reveals scattered sand; medium exposure shows 30-60% of the stones; full exposure shows all aggregate. Use aggressive 6/16-grit metal-bond discs, grind 1-4 mm deep depending on the exposure level, then step through finer metal and resin grits. The look depends heavily on the decorative aggregate originally in the slab.
| Level | What you see | Approx. depth |
|---|---|---|
| Light (cream/salt) | Sand and small stones peeking through paste | 0.5-1 mm |
| Medium | 30-60% aggregate visible, patchy paste | 1-2 mm |
| Full (rock salt) | Mostly exposed stone, little paste | 2-4 mm |
Deep exposure needs very aggressive, soft-bond metal discs that cut fast before wearing. On a floor grinder, start with a 6/16 or 30-grit metal disc such as the HTC double-arrow segment disc in a soft bond. On edges, a 7-inch cup wheel like the 12-arrow cup wheel speeds opening. Because you are removing material fast, check the slab thickness — do not grind deeper than ~1/3 of the slab.
The decorative result is the concrete you poured. Gray river gravel gives a classic salt-and-pepper; exposed red or black aggregate gives a bold look. Cheap concrete with fine sand will never look like exposed-rock terrazzo. If the design calls for specific stones, you must broadcast decorative aggregate into fresh concrete before grinding, not grind existing plain slab.
The beauty of exposed aggregate depends entirely on what was poured. Gray granite or river gravel gives classic salt-and-pepper; limestone sands out to a near-uniform tone; rounded river stones look decorative. Before promising a design, cut a test window 1 m² deep to the desired exposure and show the client. You cannot choose the stones — you can only choose how much to reveal.
Deep grinding reveals popped-out aggregate holes. Fill them after the first coarse grind with a cement-and-aggregate slurry matched to the stone, troweled flush. Let it cure, then continue. Skipping fill turns a decorative floor into a pitted one. For premium jobs, broadcast colored aggregate into the wet fill for a deliberate look.
Never grind more than roughly one third of the slab thickness. On a 100 mm slab that is 33 mm, but practical exposure stops at 2-4 mm. On thin overlays or slabs near expansion joints, stop shallower. Check for radiant heating pipes and rebar before aggressive grinding.
Exposed aggregate is porous. Seal it after grinding with a penetrating sealer to prevent staining and freeze-thaw damage. For interior decorative floors, a matte or wet-look sealer brings out stone color. Reapply every few years outdoors.
No slab is perfectly mixed. Some patches show more stone than others. This is normal and part of the look. If the client wants uniform exposure, broadcast decorative aggregate into fresh concrete during installation — you cannot achieve it by grinding an existing plain slab.
The first exposed-aggregate job usually goes too deep in spots. Start with a test patch and err on the side of light exposure — you can always grind deeper, but you cannot add stone back. Clients prefer subtle exposure to over-grinding.
A: Yes, as long as it is sound. Old slabs often have nicer aggregate than new ones, but check for laitance and coatings first.
A: Use a heavy planetary grinder with uniform pressure, cross-pass, and stay off high spots. Uneven grinding shows as patchy exposure.
A: You can stop at a ground texture, or continue to a polished, sealed aggregate floor. Most decorative jobs polish to 400-1500 grit.
A: Only if you remove more than ~2 mm on a thin slab. On 100 mm+ slabs, 2-4 mm exposure is safe.
Exposed aggregate is a function of both the concrete mix and how deep you grind. Plan the look with a test patch, use aggressive soft-bond metal discs, and fill defects before finishing. Contact JOY TECH for a soft-bond disc set tuned to deep aggregate exposure.
